
Lockheed U-2A

by Scott Edwards
Now then, most build logs end with credits to the people who inspired and assisted them. This one doesn’t. Instead it starts with blame – shameless abject finger pointing blame, and to who? That Blackburn chap, that’s who [I say, steady on – Ed].
There I was in my little world of foamies and composite planes when along comes Andy with the most beautifully designed, built and flown PSS models imaginable. To make things worse he brings them to the 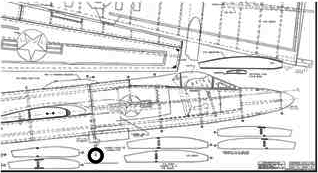 Bring and Buy where they magically end up in the back of my car. I never had the guts to fly my new acquisitions from Andy, instead I would just bring them out for ‘show and tell’ to other flying buddies as a demonstration of what can be achieved using the same materials that the rest of us mortals use.
Up until now I have only built from kits and ARTF’s; I always hankered after PSS jets, but the lack of kits on the market meant this was out of my reach, until that is when foamy EDF jets started to enter the market a couple of years ago.
My first attempt was with a styrofoam F22-Raptor which was about 40 inch span, light weight, and with tailerons. Those of you at last year’s PSS day may remember its remarkable reluctance to obey even the most basic principals of slope flight, due mainly to the control surfaces over-powering the very weedy servos. Next up was a Hanger-9 F-15 Eagle, this time with ailerons and an all-moving tailplane. Though a little more successful, it was extremely marginal at best, and soon joined its predecessor in the great green wheelie bin of history.
I had now worked out that stubby delta winged EDF foamies are usually as much use on a slope as a wet firework, probably because they’d been designed for EDF and the airfoils were all wrong (see later). But, they had given me a very big PSS scratch that just had to be itched, and there was only one solution – I was going to have to build something myself.
 Never having done any traditional building before, I started to look at PSS plans and building techniques. Plenty of them about but they all seemed relatively small, and I had this idea that said if I was going to build one, I might as well build a big one!
What to build was a tricky choice, it needed to have a conventional layout, relatively low wing loading, and have nothing too fiddly about it. The PSSA website (www.pssaonline.co.uk) is a great source of information, and a big B-52 caught my eye on there. The huge jet nacelles fell into the ‘too fiddly’ category though, which left me with one obvious choice.
I have always loved U-2’s since I saw them at Airshows in the eighties, big, black, mean and simple to build (or so I thought). Having settled on a U-2, I set out to find a big plan of one … and failed dismally. I found a 1/12 scale plan from the seventies though which just didn’t seem big enough. So, simple solution, get the plan and build it bigger. Easy, how difficult can that be, haha!
Now back to that Blackburn chap; he looked at the plans for me and pointed out that the sections and incidences were all wrong. So, as well as making it bigger, I was going to have to radically change the design too. At this point my optimism still exceeded basic common sense and I didn’t see this as a major obstacle.
Deciding on the size was simple. Work out the biggest U-2 that will fit inside a Ford Mondeo estate and you have the answer, which is 13 foot 6. Almost exactly 1/6th scale. At this scale, the fuselage is over 8 feet long, which lead to the first dent in my naivety.
My building room is only 7 foot 8. Damn.
So – just reduce the forward fuselage length by 6 inches. Simple. That will give me a couple of inches to spare. I then worked out that, at 1/6th scale, the fuselage cross section was big. I mean really, really, comedy big. Draw a circle with a diameter of 16 inches and you will see what I mean.
So, I was going to have to thin the fuselage a little too, and also reduce the size of the jet intakes to reduce drag. It turns out that practical changes such as these are what’s done to the vast majority of PSS designs anyway, and in any case, no-one will notice any minor scale inaccuracies on the slope.
With my plan sorted, together with a bucketful of optimism, it was time to ‘build a kit of parts’ as all the advice says. Formers were ¼ inch ply, and before I had finished cutting the first one out I realised I was going to need some power tools and one hell of a lot more wood.
 Ever been to Chronos Tools in Dunstable? Oh, I was in Mecca! I came out of there with (amongst several other things) a Proxon band saw – WOW!! I spent the whole afternoon just cutting up wood for fun! It’s so cool! It’s dead handy for cutting frozen minced beef and cheese too.
Before long, I had a pile of dinner plate sized formers, and after another huge delivery of wood from SLEC, it was time to get the glue out. The fuselage was to be built in two halves ‘Easter Egg’ fashion, and at this point all was going rather well …
Now then, the USAF codename for the U-2 is ‘Dragonlady’. To find out why, build a big one of these in your spare bedroom and see the effects it has on the Mrs. At first she thought it was a canoe, as it progressed she started calling me Noah. Later on she stopped calling me anything at all that could get past a Microsoft profanity filter, and just referred to it as ‘That #@!&% monstrosity’.
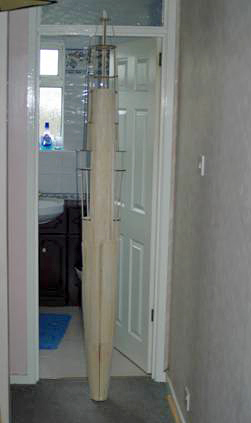
Here’s the problem you see; building something this big has implications way beyond what I anticipated. You can’t just pick it up and turn it around; you have to physically work around it. To turn it around I had to carry it out of my modelling room, lower it down the stairs, turn into the bathroom and then back it into the modelling room. This is OK until the Mrs is in the bath when the arse end of a giant U2 comes through the door.
After a few weeks though, I had two skeleton fuselage halves and it was time to do some planking! This was the bit I was dreading. I researched intensively, and got as much info as I could from my unpaid constructional consultant (that Blackburn chap again). And do you know what? It turned out to be much easier than I thought! It’s also strangely therapeutic which is good, as by golly there was a lot of it to do!
I travel around for work and I’m often stuck in hotels on my own overnight. Suddenly I had the perfect way to spend those lonely evenings – Planking!!! A small box of tools, mini vacuum cleaner and a 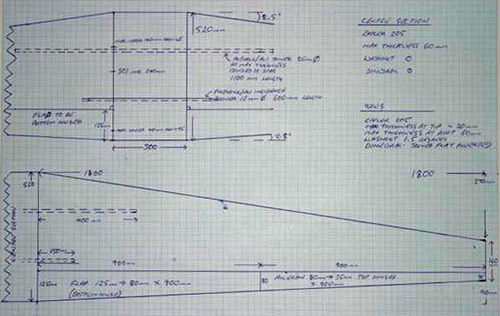 disposable plastic sheet turns a Premier Inn bedroom into a perfect place for a good evening’s planking. Dial 0 and they bring you beer too! Marching through reception with an 8 foot fuselage on your shoulder like a Polaris missile does get some odd looks but I’m quite used to that anyway.
Attention then turned to the wings. I knew that building an accurate set of wings myself at that scale was not a possibility, I would have to get them professionally built. I drew up a scale plan of the wings including joining system, control surface sizes, section (good old Eppler 205), washout etc and submitted them to my unpaid aerodynamic consultant (Blackburn again) and after incorporating a couple of suggested tweaks I sent it off to a few wing builders.
Barry Alford at Foamwings.co.uk responded with some really good constructional ideas and £221 went zooming up to Scotland for the 10 week estimated delivery time.
Waiting for the wings gave me plenty of time for the tail feathers. “Feathers”, haha. I’ve got planes with smaller wingspans than these ‘tail feathers’. I went for the advised (Blackburn) SD8020 section and built the tail from scratch which was a fabulous mini project. Plotting, printing and cutting your own-design ribs is cool. I used an 8mm carbon tube as a spar, and was really rather pleased with my first attempt at a scratch built wing – even though it was a tailplane!
For the fin I was worried about lateral strength, and a sternpost didn’t fit into the design. I therefore built four hardwood ‘legs’ into the fin that go through slots in the tailplane and deep into the fuselage. I thought of that all by myself I did ! Hee hee, I was having great fun.
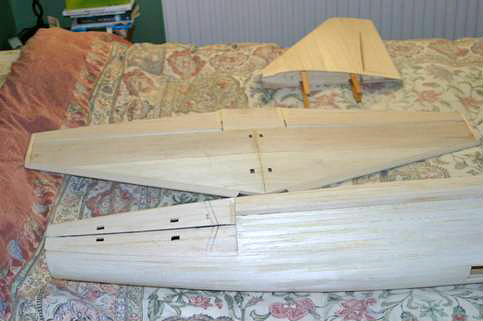
Just before Christmas the Mrs rang me to say a garden shed had been delivered by mistake. Yippeee!!! My wings had arrived. The quality was fantastic; a centre section and two outer panels, joined by a pair of dirty great aluminium tubes. White foam cores, glass sheet and obechi covered, all epoxied and vacuum bagged perfectly. When cutting out surfaces I noticed Barry had incorporated strips of carbon cloth under the obechi where the cut-outs were, really nice touch that.
I could now put the whole thing together for the very first time; well theoretically anyway, because there was nowhere in my house that big and there was a ton of snow in the garden. A club mate managed to ‘borrow’ Ivinghoe Aston Village Hall though and I was able to put it together for the very first time. Lifting it up, it somehow just felt ‘right’ you know what I mean?
The remains of the winter was spent covering the monster with a mixture of light and heavy tissue and Poly-C (bottles and bottles and bottles of Poly-C actually). This was another technique I had never used before, and (after a couple of initial foul ups) didn’t present many problems. A good rubbing down and the inevitable gaps and overlaps in the tissue were (almost) invisible, and it was time to fix the tail in place.
Building a 7 foot 6 fuselage in a 7 foot 8 foot room is stupid. Sticking a 4 foot tail on it, and a 2 foot fin is really, really, really stupid. I have to crawl in and out of my modelling room on my hands and knees to get under it. Turning it around became a two-man job and the wife’s mates presented her with a ‘With Sympathy’ card.
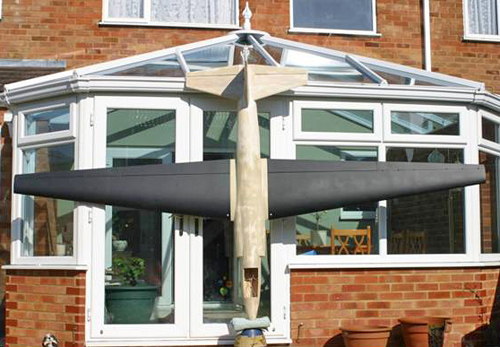 Having debated the final covering for months, I stuck with the original idea of matt black spray paint, and beige filler primer. I’ve never sprayed and rubbed down a plane before, and frankly never will again. The experience turned my world beige. Everything in the workshop was beige. I had beige hair and when I blew my nose, the hanky was beige. Beige gunge was coming out of my nose and eyes, the carpet was beige, the ceiling was beige, the dog was beige and the wife’s mates organised a candlelit vigil for her outside our house.
In the spirit of traditional building, I thought moulding a canopy in the oven couldn’t possibly be that difficult. I made a lovely balsa plug, got a supply of big clear lemonade bottles from Tesco, and waited until the Mrs was out of the country. First attempts came out looking like one of Tutankhamen’s appendages. The second batch caught fire, and the last lot would have been great if U2’s had a sunroof.
This was not going well. I swallowed my pride and sent the plug to Vortex Vacforms who made me a beautiful canopy for 8 quid, which was considerably less than I had spent on lemonade bottles.
Now this is where the story so far ends! Remaining jobs are painting the fuselage, installing the Receiver & Battery, fitting out the cockpit & canopy and buying a new oven.
With an expected wing loading of around 55 g/dm (18 oz/ft), and with a wing of this chord, it shouldn’t need the sort of lift that sucks wabbits out of their burrows like nuclear bunny silos. A nice 10-15mph should be perfect for the first flight, that’s as long as I can get it up the hill in the first place of course.
(Perhaps we should alert Luton Air Traffic Control and the RAF on the day you plan to maiden –Jim W….)
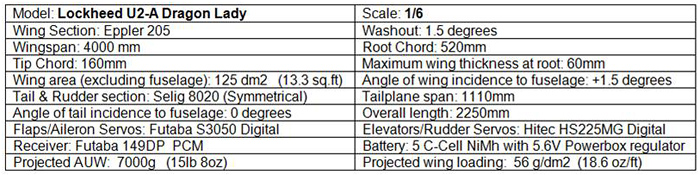
Lockheed U-2A Model Specifications:
Lockheed U-2 Part 2 by Scott Edwards
Part one of this project in the last Beacon left me with the last 5% to do which somehow took up 20% of the time (is that normal?). Making and detailing the canopy was a nice mini project, a 1/6 scale pilot looked too large as I had slimmed the fuselage from scale, so a 1/7 chap was duly mutilated and went in there in traditional Douglas Bader fashion. He even had a proper seat, switches and dials! Yes the dials are from a ¼ scale Tiger Moth but heck, he’s plastic, what does he know?
Final spraying took place in my mum’s garage, and washing down the freezer afterwards only took half an hour. Radio installation was very straightforward and I used a length of Maplins cable tidy to support the long wiring harness down the fuselage.
CG calculations were the subject of much debate, but 27% MAC was decided upon, which required about 200 grams of lead in the nose in conjunction with the 5 cell sub C battery. Measuring the CG on something this big ain’t easy! I ended up lying on my back in the garden with the assembled model on top of me between my legs. From there you can bench press the thing to measure the CG. Heaven knows what the neighbours thought, and I hope they didn’t notice the mutilated pilot limbs put out for the dustmen either.
Final setup was dialling in all of the control throws. That Blackburn fellow has a truly amazing library of knowledge, including formulae for calculating control surface movements ! These were duly calculated and set, with 2:1 differential on ailerons. The huge flaps are bottom hinged to allow 90 degrees of movement at full crow. That’s 4 square feet of wing area at right angles to forward flight. If that didn’t stop the thing then nothing would!
And then it was finished. I bathed in the glow of personal satisfaction for 5 minutes which quickly turned into the awful realisation that I was now going to have to chuck this thing off a dirty great big ‘ill.
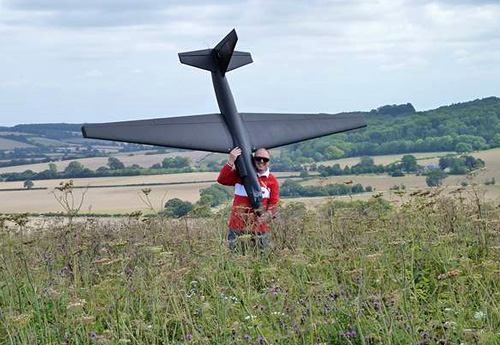
A Happy Camper (Matt Brett photo)
Timing and the weather forecast was on my side, and on the morning of the club PSS event on 6th August I woke up in a nervous sweat. For some reason, the Mrs was very keen to come and help me lob this thing from the top of the Beacon. For some reason she had ordered a skip to be delivered that afternoon too?
Anyway, this presented a new problem. How do you fit one sixth of a full size U-2, plus a Lancaster, the Mrs and a Cocker Spaniel into a Ford Mondeo estate. The answer involves pulleys, ropes and lots of dog slobber on the windscreen, but it is actually possible! So, at half past 10, I unloaded everything at the bottom of the hill whilst the Mrs parked the motor.
Oddly enough, carrying the fully assembled 17 pound behemoth up the hill wasn’t too bad, and it was soon taking up half the pits area surrounded by several other more sensibly proportioned PSS models.
The conditions were perfect, I had a few flights with the Lancaster, and then it dawned on me that I now had absolutely no possible excuses left whatsoever…. It was time.
A quick final control surface check, and then with Dave Woods on fuselage plus two human wingtip pogos, we made our way to the slope edge; it was like watching a train going off the end of a bridge in the movies. Dave took a short run at it and then suddenly there was nothing but fresh air between this huge black leviathan and the ground below.

Heads, Everyone! (Kevin Wright photo)
So, the moment of truth…the thing stormed upwards like a bloomin’ Eddie Stobart truck with wings on. I’m very glad Dave let go or he would have gone up with it. I hadn’t actually touched the controls yet, and this thing was off in the direction of Ivinghoe like an Intercontinental Ballistic Missile.
Let’s see what the control response is like – a dab of left aileron, oooh yes that responded nicely, then a bit of elevator brought it round perfectly towards the slope for a high fly past. It felt fantastic, control response was solid and predictable, everything felt in balance and a dive test gave a barely noticeable pull toward the canopy. I gained height and tried a stall where it gave nothing more than a gentle nod that turned into a flat shallow dive. I was gaining confidence now, and started doing some lower passes and steeply banked turns.

The U-2 in flight (Andy Blackburn photo)
I have heard the phrase ‘presence’ in PSS circles, but never really understood it until that moment; from underneath, against the ominous looking clouds, looking up at this huge black outline of a U-2 churning through the sky like a cross channel ferry. It really was incredibly satisfying.
Time was up, and a landing was called. I had set it up like an F3F model, and planned to land it in the same manner. It came round perfectly and at maybe 50 feet I deployed full crow. It just stopped. Didn’t go up or down, or forwards come to that, it just stopped ! A bit of down elevator lowered it gently into the unsuspecting undergrowth. I lifted it up, and you could see this perfect U-2 shape squashed into the nettles.
Wow! It had exceeded my wildest expectations, and I was amazed at its flying characteristics. I made no adjustments at all for the second flight and its performance was just as staggering as the first. I had a grin on me like a toddler at Christmas.
So – was it worth it? Holy heck yes! If you can build it, build it bigger I say. The rewards are huge, but there are unique and unexpected challenges … here are some ‘odder’ statistics!
- 40 feet of heavy duty servo wire with 66 soldered joints.
- 72 feet of leading and trailing edges to carve and sand
- 47 hinges
- 3 litres of Poly-C
- 6 cans of primer
- 12 cans of spray paint
- Two bulk orders of wood for over £100 from SLEC.
- 40 scalpel blades.
- And please, please, please don’t ask me about glue!
See some more photos of Scott’s fantastic U-2A in out Gallery Page HERE.